I love to get free stamps! I know you do too! I made the cards above with the FREE Sale-A-Bration stamp set Botanical Blooms. Those who stamp with me know that I also love floral images, so you all knew which SAB set I would choose first, didn't ya? I am also all about the bright colors so I used some Raspberry Tart DSP and the three basic colors in that designer paper of Cameo Coral, Kiwi Kiss and Rose Red. I added some Whisper White and went to town.
Four of the layouts that I chose to use were actually from the Verve Stamps blog. As I have said before, having a card layout makes it so much easier to get started! I tried to keep the cards simple, but you know that in itself is the real challenge for me!
Would you like to make these cards?
You too can receive the Botanical Blooms stamp set ABSOLUTELY FREE with a $50. order (before tax and shipping). I have put together the basic items used to make these cards below. However, if you already have some of these items, they can easily be substituted. If you need some help finding substitutions or even placing the order altogether, just contact me via e-mail or give me a call and I will be happy to help you. But hurry, Sale-A-Bration ends March 31st and after that you will no longer be able to get this FREE stamp set!
Here is the Botanical Blooms stamp set. Isn't it adorable?
The basic kit I have put together is as follows:
113975 Raspberry Tart Designer Series Paper $9.95
102544 Rose Red 8-1/2" x 11" Cardstock $5.50
100475 Cameo Coral 8-1/2" x 11" Cardstock $5.50
111353 Kiwi Kiss 8-1/2" x 11" Cardstock $5.50
100730 Whisper White 8-1/2" x 11" Cardstock $7.50
111835 Kiwi Kiss Classic Stamp Pad $5.95
103035 Cameo Coral Classic Stamp Pad $5.95
101778 Rose Red Classic Stamp Pad $5.95
113812 Botanical Blooms SAB Stamp Set FREE
Kit Total $51.80 (plus tax and shipping)
Thursday, February 26, 2009
Wednesday, February 25, 2009
My First Official Challenge...
A color challenge.....is this week's challenge for the Diva Coffee Break Design Team and anyone who wants to play along. If you decide to play along, simply go to the Diva Coffee Break Designs blog and link your blog post showing your card. If you want to play along and don't have your own blog, just send a picture of your card to me and I will link it for you! The challenge this week is to use Green Galore, Tempting Turquoise, Basic Gray and Whisper White. Here is what I came up with...
I love bright colors so this wasn't too far of a stretch for me.
Supplies:
Stamps: Pun Fun
Cardstock: Green Galore, Tempting Turquoise, Basic Gray, Whisper White, Urban Garden DSP
Ink: Black Stazon, Green Galore marker, Pink Passion marker
Accessories: White gel pen, black brads, blender pen, black watercolor pencil, scallop edge punch, dimensionals
Don't forget to subscribe to the Diva Blog or add it to your favorites so you don't miss the challenges each week! Pop on over there now and check out the other design team submissions. They are awesome!
My card layout works for Julee's Monday Mojo75 sketch too. I tried to keep it simple, but still have lots of layers on there. It was fun, though! Give it a try! If you need some help, just let me know!
If you would like to purchase any of the materials used to make this card, simply go to my business website and click on "Shop Now". Thanks for stopping by!
My third design team submission was a little more on the simple side. Those who know me know that I have a hard time with simple! I can't help it! That is just me. The inside of this card, however, only received a small bird on the inside for its decoration. I stamped the image directly on the cardstock, but then also again onto designer paper . I cut out just the body portion and layered it on top of the original bird image.
Supplies:
Stamps: Love You Much
Cardstock: Ridinghood Red, Chocolate Chip, Vanilla, Candy Lane DSP
Ink: Basic Brown, Black Stazon
Accessories: Ridinghood Red taffeta ribbon, Vintage brads, Heart to Heart punch, dimensionals
Would you like to purchase any of the supplies to make this card? Simply go to my website and click on "Shop Now".
Tuesday, February 24, 2009
Over the last six months or so, I have begun treating my Stampin' Up! business more like an actual "business" and less like a hobby. There have been some changes in our life here and we were needing a second income in our family household. However, I often felt I was running in circles and knew that I would need some guidance and help. I had heard about John Sanpietro's coaching services, decided to bite the bullet and give it a try. This has truly been the best decision for my business. John really knows how to guide and creatively inspire. If you are considering taking your business to the next level, I encourage you to click on the link below for more information about the Business Stampers Group!
- An exclusive conference call with John where he explained how to set and break down business goals
Since launching on February 2nd, the Founding Members of the Business Stampers Coaching Group - the online coaching community set up by John Sanpietro exclusively for business-minded Stamping Business Owners looking for an economical business-building solution - have received the following:
- Over 15 minutes of exclusive audio content designed to both motivate and inspire
- Three exclusive How-To Videos, including How To Keep Track of Your Finances and How To Price Your Classes
- Five Coaching Challenges which have allowed Members to focus on the important priorities AND produced immediate profit!
- Two Video Blog Evaluations which have included dozens of tips and ideas for building and maintaining a better blog
- An exclusive conference call with John where he explained how to set and break down business goals
- Several articles for Members to reproduce on their blogs and in their newsletters
- Several other articles for Members to gain more of the knowledge necessary to build their business
- Access to a private Twitter Group - Members receive exclusive text messages or e-mails from John with motivational thoughts, information and mini-challenges
- Access to the 'Strictly Business' Message Board - in the past three weeks, the Message Board has become THE gathering place for the Business Stamper community. Over 1200 messages have been posted (350 of them by John Sanpietro, responding to Member questions and comments).
All of the above and more for less than $20/month!
If you have not yet signed up to be a member yet of what is becoming the premier online coaching community for business-minded Stamping Business Owners, what are you waiting for?
To learn more, read testimonials from actual Members and/or sign up, visit: http://www.cartville.com/app/?Clk=2806793
Here is card #2! Again, I used the technique of coloring the stamp with markers before stamping the image on paper. I just love doing this with small images so you can get a multi-colored image! Another Texturz plate was also used on this card on the Kiwi Kiss cardstock, but I am not sure how well you can see it in this picture.
The inside of the card was decorated with the same stamp and designer paper. Decorating the inside just adds so much to the card. Of course, it makes it heavy too!
Supplies:
Stamps: Pocket Silhouettes
Cardstock: Ridinghood Red, Chocolate Chip, Whisper White, Bella Rose DSP
Ink: Ruby Red marker, Pretty in Pink marker, Old Olive marker
Accessories: Ridinghood Red ribbon, glue dots, Big Shot, Texturz Plate
Would you like to make this card? If you would like to purchase any of the products used to make this card, simply go to my website and click on "Shop Now". Come back tomorrow to see card #3!
Monday, February 23, 2009
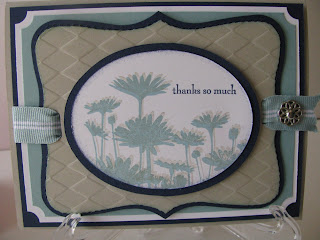
One of the requirements to be considered for the Diva Coffee Break design team was to submit three cards that I have created with current SU product that had not yet been posted / submitted anywhere. This is the first card that I came up with. The main image looks a little fuzzy in the photo, but it is actually stamped twice to give it a "shadowed" effect. Not sure if I achieved that exactly, but that was what I was going for! LOL!
I used one of the Texturz embossing plates on the second layer of the Top Note die. Love these! The inside of my card was decorated as well with the same "theme".
Supplies:
Stamps: Upsy Daisy
Cardstock: Sahara Sand, Baja Breeze, Night of Navy, Whisper White
Ink: Baja Breeze, Sahara Sand, Night of Navy
Accessories: Big Shot, Top Note die, Texturz Plate, Baja Breeze ribbon, Filigree brad, Stamp-A-Ma-Jig
If you would like to purchase any of the materials used to make this card, simply go to my website and click on "Shop Now". It's easy! I am off to work on my challenges. I will post another of the cards I submitted tomorrow. Thanks for looking.
Saturday, February 21, 2009
Exciting News......I'm a Diva!!
I have some exciting news to share with you all.....I am a new Diva for Diva Coffee Break Designs! This is my first design team experience and I can't wait to get started! Hopefully I can inspire you to play along with us. It will be so much fun! There is a brand new blog set up at www.divacoffeebreakdesigns.blogspot.com where you can meet the other design team members. Check it out!
Punched Flower
As I have said before, I am really enjoying my punches and the different images that can be made from them. This big flower simply uses the 5-Petal punch and is then paper pieced together. The little flower on top with the brad is the middle flower from the Boho Blossoms punch. It looks like putting the whole flower together would be really involved and time consuming, but it went rather quick and effortlessly. Only the first layer of the 5-Petal punch image is whole. The remaining flowers were sponged with Night of Navy and a sponge dauber and then the petals were snipped. Just a dot of Tombo Multipurpose Glue was placed on the inside corner of each petal before I slid it under and attached. I used a total of 8 flowers, including the whole one on top. A smaller flower with only 3 layers (using just 4 flower punches) looks very pretty and elegant ~ but was just too small for this card. You can see a tutorial and another beautiful example of this by Stacey King on her blog here.
Supplies:
Stamps: Sincere Salutations
Cardstock: Urban Garden DSP, Baja Breeze, Night of Navy, Not Quite Navy
Ink: Night of Navy
Accessories: 5-Petal flower punch, Boho Blossoms punch
If you would like to order any of the supplies to make this card, go to my website and click on "Shop Now". It is quick and easy....I promise!
Friday, February 20, 2009
Pockets of Posies
In looking for some inspiration for my card tonight, I used Julee's Mojo74 sketch. I just love her sketches! I tried putting my sentiment on a layered circle, but it just didn't look right to me so I just stamped the "For You" directly on the card base. For the main floral image I used markers and colored directly onto the stamp before stamping the image onto the paper. Using this technique, I was able to make the image multi-colored. The background floral image is stamped in More Mustard directly onto the More Mustard cardstock.
Supplies:
Stamps: Fresh Cuts (sentiment), Pocket Silhouettes
Cardstock: Kiwi Kiss, More Mustard, Elegant Eggplant
Ink: More Mustard and Elegant Eggplant ink pads, Elegant Eggplant marker, More Mustard marker, Old Olive marker
Accessories: Elegant Eggplant 1/4" grosgrain ribbon, dimensionals
If you would like to purchase any of the supplies to make this card, simply go to my website and click on "Shop Now". If you have any questions, please don't hesitate to contact me.
Loving These Candy Boxes!
It has been such a hectic week, so I have decided to reward myself with a little stamping time this morning. I took this little box pattern from the Stampin' Up! website, decorated it and filled with candies. Apparently, I filled it a little too much as my sides are bulging a bit, but that is okay. You can never have too much candy!
Supplies:
Stamps: Flight of the Butterfly
Cardstock: Certainly Celery, Baja Breeze, Night of Navy, Whisper White
Ink: Certainly Celery, Baja Breeze
Accessories: Baja Breeze ribbon, scallop circle punch, 1-3/8" circle punch, 1-1/4" circle punch, 1" circle punch, white gel pen, dimensionals, candy (of course!)
If you would like to purchase any of the supplies to make this adorable project, simply go to my website and click on "Shop Now". Don't forget, Sale-A-Bration is almost half over. You don't want to miss receiving these sets for FREE with your $50 order. Check it out today!
Saturday, February 14, 2009
Do You Love What You Do?
I absolutely LOVE what I do! Do you? Would you like to join my team? Whether you want to be a business minded demonstrator, a hobbyist, or just want the discount for your own stamps and supplies, Stampin' Up! offers you the flexibility to run your demonstratorship however it fits your lifestyle.
When I signed up with Stampin' Up! 10 years ago, I was strictly interested in supporting my habit (Yes, I admit that I am an addict!). There was SO MUCH that I wanted, I knew I needed the discount but had no intention of doing workshops. As time went by, my friends began getting interested in my obsession and I met a new friend who asked me to do a workshop for her. I figured I would try it that one time. Before I knew it, I was having fun AND making a little extra money for myself! How cool is that?!? At this point in my life, I am making some extra money for my family and still absolutely loving what I do. You can too!
Promotion Details...
Through March 31st, choose any retail stamp set (a value up to $47.95) from the current catalog when signing up during this Sale-A-Bration promotion. Plus, get 15% off the regular $199 price of the Starter Kit -- that's $335 worth of products for only $169!
No matter how you choose to run your Stampin' Up! business, there are SO many resources that will be available to you for ideas, etc. I promise, you won't be sorry! Simply go to my website and click "Join Now". My recruiter password is "aszitozi". If you have any questions, please don't hesitate to contact me!
Happy Valentine's Day!
Lately I have really enjoyed playing with my punches and creating new images. Of course, I can't take complete credit for this one. My 9 y/o daughter saw two hearts sitting on the desk and said, "Ooh, that looks like a butterfly!" Hmmm... It sure does, doesn't it? I have since seen a couple more cards with the same idea, so I guess great minds think alike!
This card definitely fell more into the "simple" category.
Supplies:
Stamps: Flight of the Butterfly
Cardstock: Candy Lane DSP, Chocolate Chip, Ridinghood Red, Pink Pirouette
Ink: Chocolate Chip (ink pad and marker)
Accessories: Heart to Heart punch, Photo Corners punch, Horizontal Slot punch, brads, vanilla grosgrain ribbon
If you would like to purchase any of the products to make this card, simply go to my website and click on "Shop Now". If you need any help, don't hesitate to contact me.
Friday, February 13, 2009
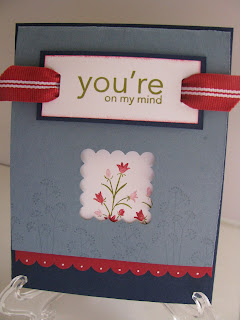
Did you miss the Stamp-A-Stack last night? If you did, you missed a good time...and some pretty cards! I received Pocket Silhouettes in an order last week and so that is one of the sets we played with last night. I love this set and have seen SO many cute cards made with it! I TRIED to keep the first card simple (- Really, Phyllis, I did!) But, I guess what is simple to me isn't always to someone else. It just seemed to be missing something and so I kept adding to it until I was happy with it.
The flower image itself on the inside of the card is colored with markers directly on the rubber and then stamped on the paper. To me, this color combination is just so delicate and pretty. On the outside of the card, the flower image is inked and stamped in Bordering Blue, the same color as the cardstock. The picture below is the inside of the card.
Supplies:
Supplies:
Stamps: Pocket Silhouettes, Upsy Daisy (greeting)
Cardstock: Bordering Blue, Ridinghood Red, Night of Navy, Whisper White
Ink: Old Olive marker, Ruby Red marker, Pretty in Pink marker, Bordering Blue
Accessories: White gel pen, scallop border punch, scallop square punch, Ridinghood Red 5/8" grosgrain ribbon, horizontal slot punch
If you would like to purchase any of the products to make this card, simply go to my website and click on "Shop Now". If you have any questions, don't hesitate to contact me.
Wednesday, February 11, 2009
I apologize as I never got back to you with postings of the remaining two close up pictures from Project Night. Actually, my intention was to redo them a bit and change a few things to make them a little more visually pleasing to me (my opinion anyway), but I never was able to get around to it and, as one thing lead to another, I just let life get in the way.
But, here they are. Sorry it took so long! Both were made with the Big Shot dies and then embellished, both super simple and easily adapted to any particular holiday or occasion!
Thursday, February 5, 2009
Stamper's Club Goodies
Our Stamper's Club got together tonight for their monthly "project night". We used the Big Shot for all three projects, all little candy holders. Any of these would be great to use for children's Valentine candy gifts! We used both the Top Note die and the Scallop Envelope die.
The first project utilized the Top Note die, first run through the Big Shot with Ridinghood Red and then with the Candy Cane DSP. We cut along the perforation on the DSP to make it just a little smaller. The stamped images are from the Love You Much stamp set and punched with the scallop circle punch, the 1-1/4" circle punch (Pirouette Pink) and the 1" circle punch (Vanilla). The ribbon is Chocolate Chip 5/8" grosgrain. A Reeses candy sits inside, adhered with a glue dot. This is not my original idea as I have seen it on several blogsites, but I am not sure where it originated from. It is adorable, though, and would make cute, quick Valentine gifts for your child's classmates or loved ones!
Supplies:
Stamps: Love You Much
Cardstock: Ridinghood Red, Candy Cane DSP, Pink Pirouette, Vanilla
Ink: Black Stazon
Accessories: Dimensionals, Scallop Circle Punch, 1-1/4" Circle Punch, 1" Circle Punch, Chocolate Chip 5/8" grosgrain ribbon, Top Note Die, Big Shot
To order any of the supplies to make this little candy holder, simply go to my website and click on "Shop Now". My next post will have another project from our project night so be sure to check back tomorrow.
Subscribe to:
Posts (Atom)